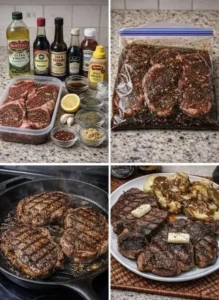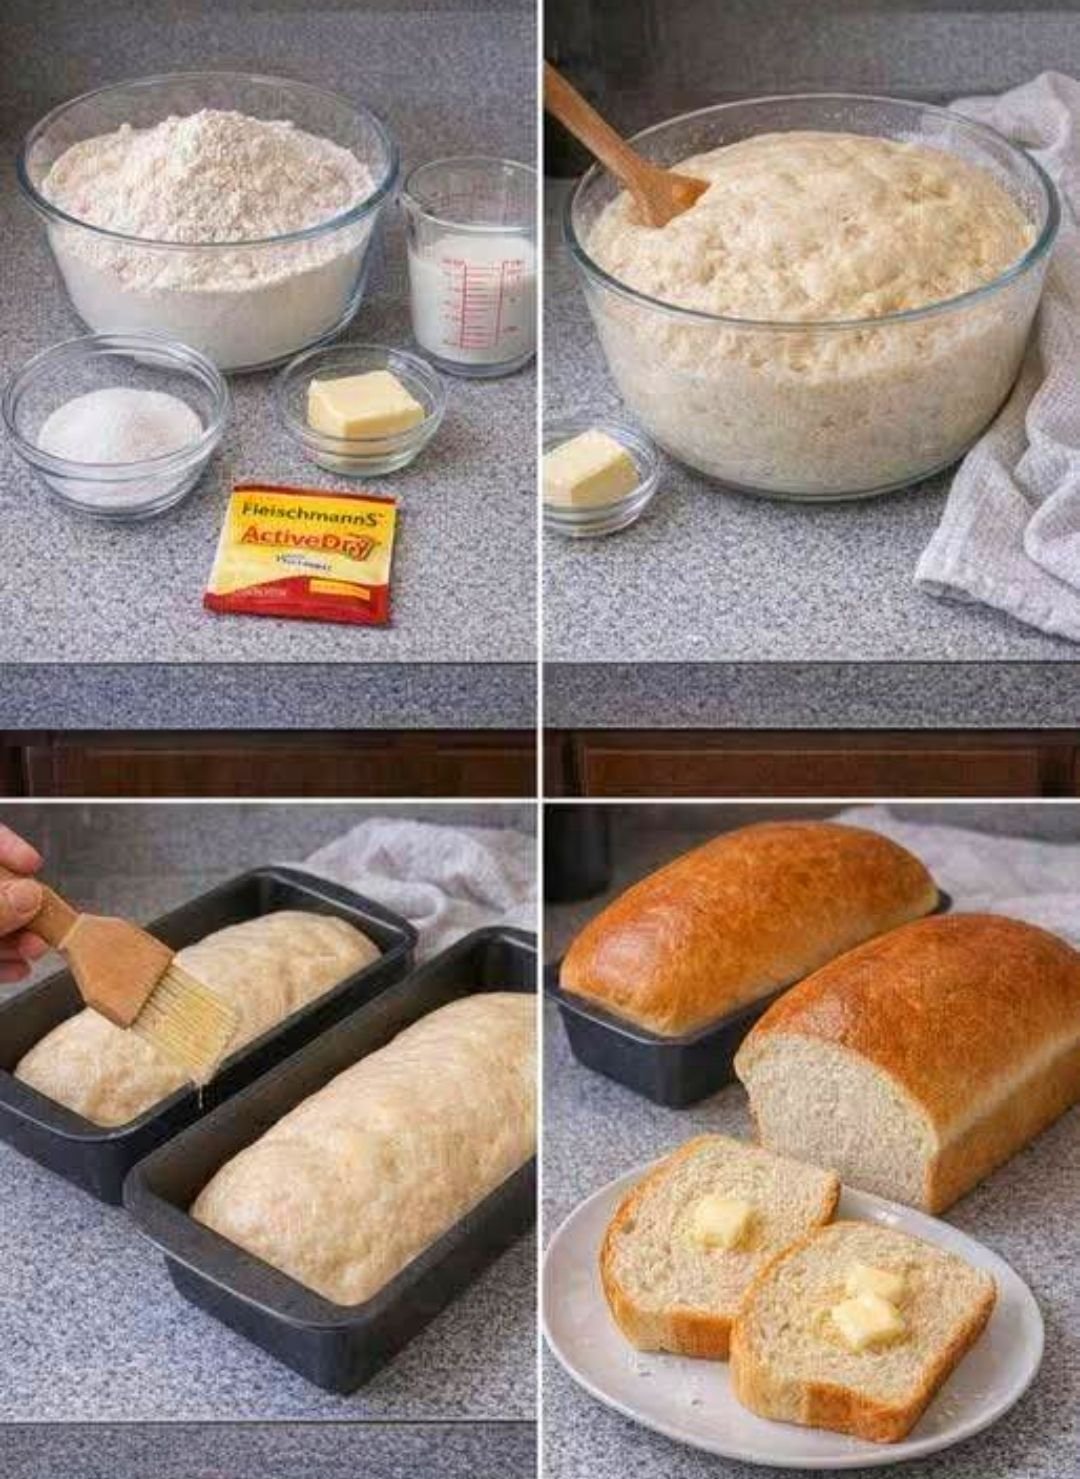
Detailed Premium Ingredient List for the Ultimate Loaf
To maximize the flavor profile and achieve that perfect bakery taste, precision and quality are key. Here is exactly what you need to create two magnificent loaves of milk bread:
- 4 Cups Premium All-Purpose Flour or Bread Flour: For the absolute best, chewiest texture, seek out unbleached organic bread flour, which has a higher protein content than standard all-purpose flour.
- 1 Cup Warm Organic Whole Milk: The temperature is critical. It must be warm (around 105°F to 110°F)—like baby bathwater. If it is too hot, it will instantly kill the yeast. If it is too cold, the yeast will not activate.
- 1 Tablespoon Premium Instant Yeast or Active Dry Yeast: Check the expiration date! Dead yeast is the number one cause of flat, failed bread.
- 2 Tablespoons Organic Pure Cane Sugar: This feeds the yeast and gives the bread its signature, delicate sweetness.
- 1 Teaspoon Fine Sea Salt or Kosher Salt: Never skip the salt; it regulates the yeast growth and provides crucial flavor balance.
- 2 Tablespoons Premium Grass-Fed Butter (Softened): The fat in the butter coats the gluten strands, keeping the bread incredibly tender and extending its shelf life naturally.
- 1 Large Organic Free-Range Egg: Brings structure, richness, and a beautiful pale yellow color to the crumb.
- 1 Tablespoon Light Cooking Oil: Avocado oil or light olive oil works perfectly.
Step-by-Step Instructions for Bakery Perfection
- Blooming the Yeast (The Crucial First Step): In the bowl of your premium stand mixer, gently whisk together the warm organic milk, sugar, and yeast. Let this mixture sit completely undisturbed for 5 to 10 minutes. It should become highly frothy and bubbly on the surface. This is the ultimate proof that your yeast is alive and ready to work its magic.
- Building the Dough: Once the yeast has bloomed, add your room-temperature egg, softened butter, oil, and salt directly into the frothy liquid. Whisk gently to combine the wet ingredients.
- The Mixing Process: Attach your heavy-duty dough hook to the stand mixer. Turn the mixer on low speed and begin adding your premium flour, one cup at a time. Continue mixing on low until a shaggy, cohesive dough begins to form and pulls away from the sides of the bowl.
- The Master Knead: Increase the mixer speed to medium-low and let the machine vigorously knead the dough for 8 to 10 minutes. You are looking for a highly elastic, smooth, and slightly tacky (but not sticky) dough. The Windowpane Test: Pinch off a golf-ball-sized piece of dough and gently stretch it between your fingers. If you can stretch it thin enough to see light passing through it without it tearing, your gluten is perfectly developed!
- The First Proof (Bulk Fermentation): Form the dough into a tight, smooth ball. Place it into a lightly oiled, premium glass mixing bowl. Cover the bowl tightly with plastic wrap or a warm, damp kitchen towel. Place it in a warm, draft-free spot in your kitchen for 1 to 1.5 hours, or until the dough has massively doubled in size.
- Shaping the Loaves: Gently punch the risen dough down to release the excess gas. Turn it out onto a clean, lightly floured surface. Divide the dough evenly into two equal portions (use a digital kitchen scale for absolute perfection). Gently flatten each portion into a rectangle, then tightly roll them up into a log shape, pinching the seams securely closed.
- The Second Proof: Place each shaped log, seam-side down, into your premium greased loaf pans. Cover them loosely with a towel and let them rise for another 30 to 40 minutes, until the dough is crowning beautifully just above the rim of the pans.
- The Golden Bake: Preheat your oven to 350°F (180°C). For an exquisite, glossy, professional bakery finish, gently brush the tops of the risen loaves with a splash of milk or a beaten egg wash. Bake on the center rack for 25 to 30 minutes. The loaves should be a deep, rich golden brown and sound hollow when tapped on the bottom.
- The Cooling Phase: This is the hardest part! Remove the bread from the pans immediately to prevent soggy bottoms, and let them cool completely on a wire rack for at least one hour before slicing. Slicing hot bread crushes the delicate crumb.
High-Yield Budget Variations and Storage Strategies
The true beauty of this master recipe is its incredible versatility. Once you conquer the basic dough, you can transform it into countless premium bakery items without spending an extra dime at the store.
- Cinnamon Raisin Swirl: Before rolling the dough into logs, sprinkle the flattened rectangle generously with a mixture of dark brown sugar, premium cinnamon, and plump organic raisins.
- Savory Cheese Loaf: Fold one cup of high-quality shredded sharp cheddar cheese and a handful of diced jalapeños directly into the dough during the final minutes of kneading.
- Whole Wheat Blend: Substitute 1.5 cups of the all-purpose flour with premium stone-ground whole wheat flour for a massive fiber boost, keeping in mind you may need an extra splash of warm milk.
To maximize your household savings, bake these loaves in double batches. Homemade bread lacks chemical preservatives, so it will only stay fresh on the counter for about 3 days in an airtight container. However, this bread freezes flawlessly! Slice the cooled bread completely, place the slices into heavy-duty freezer bags, and store them for up to 3 months. You can pull individual slices straight from the freezer and drop them directly into the toaster for a spectacular, instant breakfast. Ditch the expensive supermarket bakery aisle forever and master this phenomenal budget-friendly artisan milk bread today!